
エンジニアの内田(@spesnova)です。
「実践!Elasticsearch」 の第二回として、今回は Chef を使って Elasticsearch クラスタを AWS の EC2 上に構築する方法を紹介します。
Chef の基本的な部分については説明を省きます。
目次
- test-kitchen 環境準備
- 単体の Elasticsearch サーバーを立てる
- Elasticsearch プラグイン込みで構築する
- Nginx を追加してアクセスを制限する
- EC2 上に Elasticsearch クラスタを立てる
test-kitchen 環境準備
Elasticsearch クラスタ構築は test-kitchen を使って進めて行きます。
demo 用の test-kitchen 環境を準備します。
- Ruby, Chef, Berskfile
- VirtualBox (
$ brew cask install virtualbox) - Vagrant 1.4.3
をインストールした状態で、
Cookbook 作成
$ berks cookbook demo && cd demo
Gemfile
source 'https://rubygems.org'

gem 'berkshelf'
gem 'foodcritic'
gem 'rubocop'

group :integration do
  gem 'test-kitchen'
  gem 'kitchen-vagrant'
  gem 'busser'
  gem 'serverspec'
end
$ bundle install
次に test-kitchen でのテスト時に serverspec を使うための busser プラグイン(busser-serverspec)をインストール
(公式ドキュメントにあるように test-kitchen がテスト用ディレクトリの名前からどの busser を対象サーバに入れるか判定して入れてくれるので、自分で入れる必要はなかったです)
.kitchen.yml
provisioner:
  name: chef_solo

driver_config:
  require_chef_omnibus: true

platforms:
- name: ubuntu-12.04
  driver:
    name: vagrant
  provider: virtualbox
  driver_config:
    box: opscode-ubuntu-12.04
    box_url: https://opscode-vm.s3.amazonaws.com/vagrant/opscode_ubuntu-12.04_provisionerless.box
    customize:
      memory: 2048
      cpuexecutioncap: 100

suites:
test-kitchen で serverspec を使うための準備
$ cd test/integration
$ mv default blog-elasticsearch
$ cd blog-elasticsearch
$ serverspec-init
Select OS type:

  1) UN*X
  2) Windows

Select number: 1

Select a backend type:

  1) SSH
  2) Exec (local)

Select number: 2

 + spec/
 + spec/localhost/
 + spec/localhost/httpd_spec.rb
 + spec/spec_helper.rb
 + Rakefile
$ rm Rakefile && mv spec serverspec
$ cd serverspec/localhost/
$ mv httpd_spec.rb blog_elasticsearch_spec.rb
blog_elasticsearch_spec.rb
require 'spec_helper'
単体の Elastcsearch サーバーを立てる
最初に、単体の Elasticsearch サーバーを立てましょう。
Elasticsearch は、Chef Cookbook が公式にサポートされているのでそちらを中心に作って行きます。
まずは、単体の elasticsearch サーバーが立っているか確認する serverspec を簡単に用意しておきます。
blog_elasticsearch_spec.rb
require 'spec_helper'

describe command("curl localhost:9200") do
  it { should return_exit_status 0 }
end

describe service("elasticsearch") do
  it { should be_running }
end
elasticsearch 用の test-suite を用意します。
.kitchen.yml
diff --git a/.kitchen.yml b/.kitchen.yml
index 5f526ae..fd47c9c 100644
--- a/.kitchen.yml
+++ b/.kitchen.yml
@@ -17,3 +17,16 @@ platforms:
       cpuexecutioncap: 100

 suites:
+- name: blog-elasticsearch
+  run_list:
+   - recipe[apt]
+   - recipe[build-essential]
+   - recipe[git]
+   - recipe[java]
+   - recipe[elasticsearch]
+  attributes:
+    elasticsearch:
+      version: 1.0.0
+    java:
+      install_flavor: openjdk
+      jdk_version: 7
- ベースとして、
apt、build-essential,gitrecipe を適用します。apt-get updateの実行や build-essential 関連パッケージのインストール
- 次に elasticsearch に必要な JAVA 環境を
javarecipe でインストール。override_attributesで JAVA のバージョンと OpenJDK を利用することを指定。
- 最後に elasticsearch 公式サポートの elasticsearch cookbook の
defaultrecipe によって elasticsearch をインストール。override_attributesでバージョンを指定しています。
elasticsearch::default recipe ではざっくりと以下のことを行っています。
- elasticsearch 用 user/group の作成
- elasticsearch 用ディレクトリ(
/usr/local/elasticsearchと/usr/local/elasticsearch-<バージョン>)の作成 - elasticsearch の設定ファイル配置
- elasticsearch のインストール
- init スクリプトの配置とサービス起動
community cookbook として apt, build-essential, git, elasticsearch cookbook を利用するので、Berksfile に追加。
site :opscode

metadata

cookbook "apt",
  :git => "https://github.com/opscode-cookbooks/apt.git"
cookbook "build-essential",
  :git => "https://github.com/opscode-cookbooks/build-essential.git"
cookbook "git",
  :git => "https://github.com/opscode-cookbooks/git.git"
cookbook "elasticsearch",
  :git => "https://github.com/elasticsearch/cookbook-elasticsearch.git"
$ berks install
準備ができたので elasticsearch サーバーを立ててみます
$ bundle exec kitchen setup blog-elasticsearch-ubuntu-1204
立てたサーバーに対して serverspec でテスト
$ bundle exec kitchen verify blog-elasticsearch-ubuntu-1204
これで単体の elasticsearch サーバーが立ちました!
(init スクリプトの中で ruby を使って json のパースなどをしており、ruby を入れてないので command not found と出ますが今回は無視)
もう少しちゃんと確認したい場合はテストを追加するなり kitchen login して確認するようにします。
設定の中で重要となるメモリサイズですが、elasticsearch cookbook の方でデフォルトで搭載メモリの 60% を割り当てるようになっています。 この設定を含め elasticsearch cookbook の attributes/default.rb に書かれているので細かい設定はここから変えます。(elasticsearch.yml などの設定ファイルは attributes の値を用いて動的に作成されるので、直接それらのファイルを編集することはありません)
Elasticsearch プラグイン込みで構築する
次は Elasticsearch のプラグイン込みで構築するできるようにしましょう。
elasticsearch::plugins を使います。この recipe では
- plugin を置くディレクトリを作成
- attributes に指定したプラグインを順々にインストール
を行ってくれます。プラグインが入ってるかどうかを elasticsearch の node 情報 API を叩いて簡単ですが確認するようにします。
diff --git a/test/integration/blog-elasticsearch/serverspec/localhost/blog_elasticsearch_spec.rb b/test/integration/blog-elasti
index e83f903..0a4551a 100644
--- a/test/integration/blog-elasticsearch/serverspec/localhost/blog_elasticsearch_spec.rb
+++ b/test/integration/blog-elasticsearch/serverspec/localhost/blog_elasticsearch_spec.rb
@@ -7,3 +7,15 @@ end
 describe service("elasticsearch") do
   it { should be_running }
 end
+
+describe command("curl localhost:9200/_nodes | grep head") do
+  it { should return_exit_status 0 }
+end
+
+describe command("curl localhost:9200/_nodes | grep HQ") do
+  it { should return_exit_status 0 }
+end
+
+describe command("curl localhost:9200/_nodes | grep kuromoji") do
+  it { should return_exit_status 0 }
+end
この recipe を run_list に追加し、プラグインを指定します。
diff --git a/.kitchen.yml b/.kitchen.yml
index fd47c9c..71ae019 100644
--- a/.kitchen.yml
+++ b/.kitchen.yml
@@ -24,9 +24,17 @@ suites:
    - recipe[git]
    - recipe[java]
    - recipe[elasticsearch]
+   - recipe[elasticsearch::plugins]
   attributes:
     elasticsearch:
       version: 1.0.0
+      plugins:
+        mobz/elasticsearch-head:
+          version: latest
+        royrusso/elasticsearch-HQ:
+          version: latest
+        elasticsearch/elasticsearch-analysis-kuromoji:
+          version: 2.0.0
     java:
       install_flavor: openjdk
       jdk_version: 7
既に立てているサーバーに対して chef-solo 実行
$ bundle exec kitchen converge blog-elasticsearch-ubuntu-1204
テスト
$ bundle exec kitchen verify blog-elasticsearch-ubuntu-1204
Nginx を追加してアクセスを制限する
本番環境など開発環境以外で使って行くとなると、アクセス制限が必要になるケースも出てくると思います。
これに関しても公式 Cookbook でサポートされています。elasticsearch::proxy recipe を使います。
この recipe では
- elasticsearch 用の reverse proxy として nginx のインストール
- elasticsearch 用に nginx の設定ファイルを作成
- 8080 port を 9200 port にルーティング
- username/password が指定してある場合はベーシック認証をかける
を行ってくれます。テストは
- 8080 番にアクセスして 401 となること
- username/password 付きだとアクセスできること
- site plugin にも nginx 経由でアクセスできること
を確認するようにします
diff --git a/test/integration/blog-elasticsearch/serverspec/localhost/blog_elasticsearch_spec.rb b/test/integration/blog-elasti
index 0a4551a..43780fe 100644
--- a/test/integration/blog-elasticsearch/serverspec/localhost/blog_elasticsearch_spec.rb
+++ b/test/integration/blog-elasticsearch/serverspec/localhost/blog_elasticsearch_spec.rb
@@ -19,3 +19,15 @@ end
 describe command("curl localhost:9200/_nodes/blog-elasticsearch-ubuntu-1204 | grep kuromoji") do
   it { should return_exit_status 0 }
 end
+
+describe command("curl http://localhost:8080") do
+  it { should return_stdout /401/ }
+end
+
+describe command("curl http://naka:akiko@localhost:8080 | grep blog-elasticsearch") do
+  it { should return_exit_status 0 }
+end
+
+describe command("curl http://naka:akiko@localhost:8080/_plugin/head") do
+  it { should_not return_stdout /401/ }
+end
proxy recipe を追加して、nginx に関する attribute を設定
diff --git a/.kitchen.yml b/.kitchen.yml
index 71ae019..ab6c719 100644
--- a/.kitchen.yml
+++ b/.kitchen.yml
@@ -25,6 +25,7 @@ suites:
    - recipe[java]
    - recipe[elasticsearch]
    - recipe[elasticsearch::plugins]
+   - recipe[elasticsearch::proxy]
   attributes:
     elasticsearch:
       version: 1.0.0
@@ -35,6 +36,11 @@ suites:
           version: latest
         elasticsearch/elasticsearch-analysis-kuromoji:
           version: 2.0.0
+      nginx:
+        allow_cluster_api: true
+        users:
+          - username: naka
+            password: akiko
     java:
       install_flavor: openjdk
       jdk_version: 7
allow_cluster_api という attribute は、head なり BigDesk などが利用する cluster API へのアクセスを許可する場合は true にする
(今回はデモなので直接書いてますが、ベーシック認証の username/password は encrypted data bag に入れた上で node attributes からロードして override するなりして使った方が良いです。)
$ bundle exec kitchen converge blog-elasticsearch-ubuntu-1204
テスト
$ bundle exec kitchen verify blog-elasticsearch-ubuntu-1204
EC2 上に Elasticsearch クラスタを立てる
EC2 インスタンス上の Elasticsearch サーバーでクラスタを作るには、EC2 Discovery を利用します。EC2 Discovery を簡単に説明すると、EC2 API から EC2 インスタンス一覧を取得し、
- EC2 の security group
- elasticsearch のクラスタ名
- EC2 の tag
- AWS の AZ
でフィルタリングしてクラスタを構成する仲間を見つけるプロセスになります。(正確にはマスターノードをまず探しに行き、見つからなければ自身がマスターに、見つかった場合はそのマスターの仲間になる)Elasticsearch の AWS Cloud Plugin を入れ、いくつか設定を追加することで利用できるようになります。
このプラグインについても Chef から追加し、設定も attribute で管理します。
(Discovery 自体については、Elasticsearch 本 276 ページ当たりに丁寧に載っています。) (Chef Server を使っている場合は、Chef の search を使った search discovery という選択肢もあります)
kitchen-ec2 の準備
test-kitchen を使って EC2 インスタンス上に Elasticsearch サーバーを立てるために、kitchen-ec2 の準備をします。
まずは、AWS にて elasticsearch 用の security group を作ってください。

次に、Elasticsearch サーバーが EC2 Discovery 時に EC2 API を叩けるように新しく EC2 アカウントを用意します。(IAM ROLE を使っていないのは test-kitchen で IAM ROLE がサポートされたのが最近でまだ試してないのです…)
以下の権限を与えてください
{
  "Version": "2012-10-17",
  "Statement": [
    {
      "Action": "ec2:Describe*",
      "Effect": "Allow",
      "Resource": "*"
    }
  ]
}
test-kitchen で EC2 インスタンスを扱うために Gemfile を更新します
diff --git a/Gemfile b/Gemfile
index 97886d9..62ede2e 100644
--- a/Gemfile
+++ b/Gemfile
@@ -7,6 +7,7 @@ gem 'rubocop'
 group :integration do
   gem 'test-kitchen'
   gem 'kitchen-vagrant'
+  gem 'kitchen-ec2'
   gem 'busser'
   gem 'serverspec'
 end
$ bundle install
次に、kitchen.yml に EC2 driver の platform を追加します。(下記 aws_ssh_key_id と ssh_key に関しては普段 EC2 インスタンスを作成する際に使ってるものを指定してください)
@@ -16,6 +16,20 @@ platforms:
       memory: 2048
       cpuexecutioncap: 100

+- name: ec2-ubuntu-12.04
+  driver:
+    name: ec2
+    region:  ap-northeast-1
+    availability_zone: ap-northeast-1
+    flavor_id: m3.medium
+    image_id: ami-3f32ac3e
+    aws_ssh_key_id: ssh-key # 適宜変更
+    ssh_key: ~/.ssh/ssh-key.pem # 適宜変更
+    username: ubuntu
+    security_group_ids: ["sg-74e4ac0b"] # 適宜変更
+    port: 22
+    ebs_optimized: false
+
ここで先ほどまで使っていた VM を消してしまいます
$ bundle exec kitchen destroy
$ bundle exec kitchen list
Instance                            Driver   Provisioner  Last Action
blog-elasticsearch-ubuntu-1204      Vagrant  ChefSolo     <Not Created>
blog-elasticsearch-ec2-ubuntu-1204  Ec2      ChefSolo     <Not Created>
AWS Cloud Plugin を利用してクラスタを作る
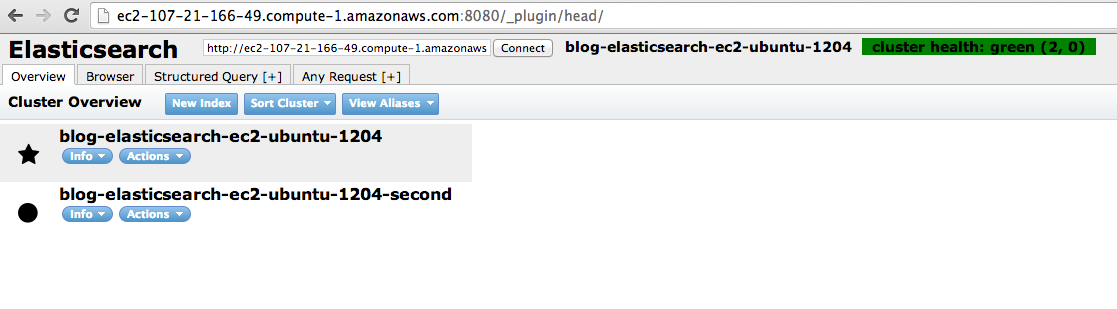
テストは、cluster API で number_of_nodes が 2 であることを見てクラスタができたか確認することにします。
diff --git a/test/integration/blog-elasticsearch/serverspec/localhost/blog_elasticsearch_spec.rb b/test/integration/blog-elasti
index 43780fe..1ac5f0b 100644
--- a/test/integration/blog-elasticsearch/serverspec/localhost/blog_elasticsearch_spec.rb
+++ b/test/integration/blog-elasticsearch/serverspec/localhost/blog_elasticsearch_spec.rb
@@ -31,3 +31,7 @@ end
 describe command("curl http://naka:akiko@localhost:8080/_plugin/head") do
   it { should_not return_stdout /401/ }
 end
+
+describe command("curl http://naka:akiko@localhost:8080/_cluster/health") do
+  it { should return_stdout /"number_of_nodes"\:2/ }
+end
.kitchen.yml に aws recipe を追加します
diff --git a/.kitchen.yml b/.kitchen.yml
index f02b37b..5c3f2db 100644
--- a/.kitchen.yml
+++ b/.kitchen.yml
@@ -40,9 +40,12 @@ suites:
    - recipe[elasticsearch]
    - recipe[elasticsearch::plugins]
    - recipe[elasticsearch::proxy]
+   - recipe[elasticsearch::aws]
   attributes:
     elasticsearch:
       version: 1.0.0
+      cluster:
+        name: demo
      plugins:
         mobz/elasticsearch-head:
           version: latest
@@ -50,11 +53,25 @@ suites:
           version: latest
         elasticsearch/elasticsearch-analysis-kuromoji:
           version: 2.0.0
+        elasticsearch/elasticsearch-cloud-aws:
+          version: 2.0.0.RC1
       nginx:
         allow_cluster_api: true
+        allow_status: true
         users:
           - username: naka
             password: akiko
+      cloud:
+        aws:
+          region: ap-notheast-1
+          access_key: es 用に作成したアカウントの access key id
+          secret_key: es 用に作成したアカウントの secret access key
+      discovery:
+        type: ec2
+        ec2:
+          groups: elasticsearch
     java:
       install_flavor: openjdk
       jdk_version: 7
elasticsearch::awsrecipe を追加- AWS Cloud Plugin をインストールしてくれる
- クラスタ名を指定
- region を指定
- EC2 API を叩ける AWS アカウント情報を追加
- discovery タイプを EC2 に指定
- フィルタリングに使う securitygroup 名を指定
nginx.allow_status: trueELB などのヘルスチェック用に /status はベーシック認証をかけないように
1 台目を作る(途中でこける場合は「まとめ」部分のはまりポイント見てみてください)
$ bundle exec kitchen converge blog-elasticsearch-ubuntu-1204
テスト
$ bundle exec kitchen verify blog-elasticsearch-ubuntu-1204
最後のテストが落ちます。
もう 1 台ノードを追加するために EC2 driver の platform を追加
diff --git a/.kitchen.yml b/.kitchen.yml
index 2e16e78..48968ec 100644
--- a/.kitchen.yml
+++ b/.kitchen.yml
@@ -30,6 +30,20 @@ platforms:
     port: 22
     ebs_optimized: false

+- name: ec2-ubuntu-12.04-second
+  driver:
+    name: ec2
+    region:  ap-northeast-1
+    availability_zone: ap-northeast-1
+    flavor_id: m3.medium
+    image_id: ami-3f32ac3e
+    aws_ssh_key_id: ssh-key # 適宜変更
+    ssh_key: ~/.ssh/ssh-key.pem # 適宜変更
+    username: ubuntu
+    security_group_ids: ["sg-74e4ac0b"] # 適宜変更
+    port: 22
+    ebs_optimized: false
+
 suites:
 - name: blog-elasticsearch
   run_list:
2 台目のノードを立ち上げます
$ bundle exec kitchen setup blog-elasticsearch-ubuntu-1204-second
再度テスト
$ bundle exec kitchen verify blog-elasticsearch-ubuntu-1204
無事に EC2 上に Elasticsearch クラスタができました!
まとめ
今回は、test-kitchen だけで進めて行きましたが、実際には suites に書いた run list や attributes などは role にまとめるなりして使うと良いと思います。また serverspec では jq コマンドを対象サーバーにインストールしておいて API レスポンスをパースしてテストした方が良いです… (今回はかなりざっくりやってるので)
Chef を使って構築すると、構築が自動化出来るだけでなく、各種設定も attributes として管理できるようになります。インフラに関する変更を Chef のリポジトリに集約できるので管理がしやすくなります。
はまりポイント?
apt-get updateされてない- そもそも apt recipe 入れてないとか
- AMI によっては
/var/lib/apt/periodic/update-success-stampが作成されていて、apt cookbook の default recipe がnot_if条件により update してくれない - recipe を 1 つ用意して強制的に呼ぶのが良い
- elasticsearch が起動しない場合は plugin のバージョンを確認
- elasticsearch 本体のバージョンに対応してないプラグインバージョンを使うと es が起動しない
さらに、この続きでやると良いこと
Environmentという EC2 tag を追加して、production / staging などの環境毎にクラスタを作るaws_resource_tagresource を使ってプロビジョニング時 に Chef の environment を tag の値として自動付加
- Elasticsearch クラスタの前に ELB などのロードバランサーを置いてエンドポイントを統一
aws_elastic_lbresource を使ってプロビジョニング時に ELB へ自動登録
elasticsearch::monitrecipe を利用して elasticsearch サーバーのプロセス監視を行う- run list で
elasticsearch::defaultrecipe の前にmonit::defaultrecipe を追加して、最後にelasticsearch::monitrecipe を追加するだけでよい
- run list で
参考資料
Tweet
最近の記事
- エンジニアブログは移転しました
- 管理画面チラ見せ♡ナイト#3 に登壇してきました
- Apple Watchアプリをリリースしていました
- Wantedlyのデザイン事情について UI Crunch #8で発表しました!
- Wantedlyの最近のReact事情についてMeguro.es #3で発表しました!
- Reactive Swift Meetup @Wantedlyを開催しました!
- 2016年のWantedlyアーキテクチャ (1)
- Wantedly Spring Internship 2016
- よちよちPythonしてきた〜プログラミングは料理と一緒〜
- Wantedly エンジニアチームは湯河原温泉で開発合宿を行いました!