
こんにちは、エンジニアの内田(@spesnova)です。
Wantedly では最近 Elasticsearch を使った検索機能をリリースしました。 それに伴い Elasticsearch で日本語検索を作っていく際の基本的な部分や使ってみて非常に便利だったプラグイン、本番環境の構築や運用でのノウハウを紹介をしていきたいと思います。
第一回(何回まであるかは知らない…)の今回は導入も兼ねて、「ruby で検索してヒットする募集を出している東京の会社」といった検索ができるようにしてみましょう。
目次的なもの
- Elasticsearch について
- 開発環境準備
- どうデータを Elasticsearch に入れるか
- Analysis
- Mapping
- 簡単なクエリと Sense
- フィルタ
- 親子関係
Elasticsearch について
Elasticsearch について一通り学ぶには、以下の資料がオススメです。
自分はこの資料を見て育ちました
開発環境準備
Mac に開発環境を用意しましょう。
elasticsearch 本体は homebrew からインストール。
$ brew install elasticsearch
次にプラグインを入れて行きます。
クエリを実行するコンソールとして elasticsearch marvel plugin を入れます。
$ /usr/local/bin/plugin -install elasticsearch/marvel/latest
analyzer を試すのに便利な inquisitor も入れておきます。
$ /usr/local/bin/plugin -install polyfractal/elasticsearch-inquisitor
日本語形態素解析エンジンの kuromoji も入れます。 インストールした elasticsearch のバージョンに合わせて適切なプラグインのバージョンを使ってください。
$ /usr/local/bin/plugin -install elasticsearch/elasticsearch-analysis-kuromoji/2.0.0.RC1
(その他 head や HQ 等便利なプラグインはまだまだあります ので、好きな物を入れましょう)
elasticsearch をフォアグラウンドで起動しておきます。
# 1.0 からは
$ elasticsearch

# 0.9x 以下は
$ elasticsearch -f
どうデータを Elasticsearch に入れるか
今回は検索対象のデータとして、会社を 5 つ、募集をそれぞれ 1, 2 つずつ elasticsearch に入れることにしましょう。 (参考: Elasticsearch のデータ構造)
wantedly index に company type と project type を作り、1 つ 1 つの会社や募集を elasticsearch の 1 つのドキュメントとして扱うことにしましょう。会社と募集を type で分けずに全く別の index にすることも可能ですが、
- type ごとに shard の設定を変えたい -> 設定が index ごとなので分ける必要が出てくる
- データの更新頻度やサイズが type によって別々 -> パフォーマンスの問題の切り分け時に複雑になる
といった状況でなければ type で分けるのが良いでしょう。
会社は
- id
- name - 会社名
- location - 所在地
募集は
- id
- title - 募集タイトル
- company_id - 会社 ID
というフィールドを持っているとし、以下のようなサンプルデータを使うことにします。
会社
| id | name | location |
|---|---|---|
| 1 | wantedly | 東京都港区白金台 3-19-6 白金台ビル3F |
| 2 | heroku | 東京都千代田区丸の内2-7-2 JPタワー 12階 |
| 3 | higanworks | 大阪府大阪市中央区道修町2-2-5 |
| 4 | hatena | 京都府京都市中京区御池通間之町東入高宮町206 |
| 5 | nulab | 福岡市博多区中洲5丁目5-13 KDC福岡ビル7F |
(地域別に web 系の会社選んでみました、特に深い意味はないです)
募集
| id | title | company_id |
|---|---|---|
| 1 | iOS エンジニア ウォンテッド! | 1 |
| 2 | Ruby on Rails 得意なエンジニアウォンテッド! | 1 |
| 3 | Ruby 好きウォンテッド! | 2 |
| 4 | Chef と Ruby 書ける人ウォンテッド! | 3 |
| 5 | Perl エンジニアウォンテッド! | 4 |
| 6 | Java エンジニアウォンテッド! | 5 |
(募集はダミーデータです)
(参考: ドキュメント登録の流れについては Elasticsearch 入門 を参照すると良いです。)
Analyzer
上記のデータを実際に入れる前に、index の作成と analyzer の設定をします。
以下のコマンドを実行することで analyzer の設定ができます。 下記で説明して行きます。
curl -XPUT 'http://localhost:9200/wantedly-demo' -d \
'{
  "settings": {
    "analysis": {
      "filter": {
        "pos_filter": {
          "type": "kuromoji_part_of_speech",
          "stoptags": [
            "助詞-格助詞-一般",
            "助詞-終助詞"
          ]
        },
        "greek_lowercase_filter": {
          "type": "lowercase",
          "language": "greek"
        }
      },
      "tokenizer": {
        "kuromoji": {
          "type": "kuromoji_tokenizer"
        },
        "ngram_tokenizer": {
          "type": "nGram",
          "min_gram": "2",
          "max_gram": "3",
          "token_chars": [
            "letter",
            "digit"
          ]
        }
      },
      "analyzer": {
        "kuromoji_analyzer": {
          "type": "custom",
          "tokenizer": "kuromoji_tokenizer",
          "filter": [
            "kuromoji_baseform",
            "pos_filter",
            "greek_lowercase_filter",
            "cjk_width"
          ]
        },
        "ngram_analyzer": {
          "tokenizer": "ngram_tokenizer"
        }
      }
    }
  },
  "mappings": {
    "company": {
      "_source": {
        "enabled": true
      },
      "_all": {
        "enabled": true,
        "analyzer": "kuromoji_analyzer"
      },
      "properties": {
        "id": {
          "type": "integer",
          "index": "not_analyzed"
        },
        "name": {
          "type": "string",
          "index": "analyzed",
          "analyzer": "ngram_analyzer"
        },
        "location": {
          "type": "string",
          "index": "analyzed",
          "analyzer": "kuromoji_analyzer"
        }
      }
    },
    "project": {
      "_source": {
        "enabled": true
      },
      "_all": {
        "enabled": true,
        "analyzer": "kuromoji_analyzer"
      },
      "_parent": {
        "type": "company"
      },
      "properties": {
        "id": {
          "type": "integer",
          "index": "not_analyzed"
        },
        "title": {
          "type": "string",
          "index": "analyzed",
          "analyzer": "kuromoji_analyzer"
        }
      }
    }
  }
}'
analyzer を利用するのはただ単にデータを突っ込むだけでは検索に引っかからないためです。 例えば、Wantedly の住所は、何もしないと「東」や「京」ではヒットしますが、「東京」ではヒットしません。
では analyzer とは?
analyzerとは文字列の分割方法を定義するtokenizerと、分割後の文字列の整形処理を定義するfilterによって構成されます。
例えば、tokenizerがngramで文字列を分割し、filterで大文字小文字を小文字に統一してしまうなどといった定義をすることが出来ます。
analyzerはいくつでも定義することが出来き、フィールドごとにどのanalyzerを利用するか決めることが出来ます。
(「Elasticsearch チュートリアル」より。参考: Analyzer)
inquisitor プラグインを使って実際に analyzer を使ってみましょう
http://localhost:9200/_plugin/inquisitor/#/analyzers にアクセスして、"Wantedly" と入力してみてください

standard や simple など analysis を行う analyzer がビルトインで入っています。 “Wantedly” という文字列は analyzer によって “wanteldy” だったり、"Wantedly" だったり、"want" になります。
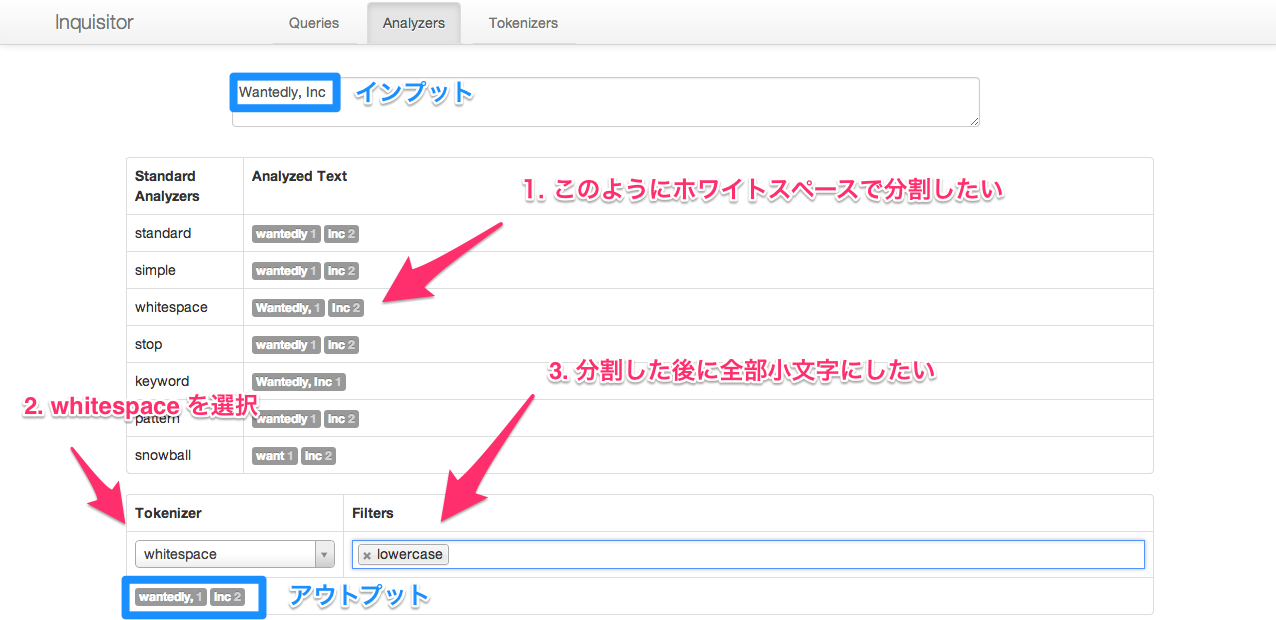
“Wantedly, Inc” と入力すると、カンマ区切りで分割されたりホワイトスペースで分割されたりします。 画像の例では、
- whitespace tokenizer を使ってホワイトスペース区切りで分割し、
- lowercase token filter を使って分割した token を全部小文字にします
この 2 つの処理から構成されるのが analyzer ということです。
今回実際に検索で使う日本語が入った住所を入れてみます
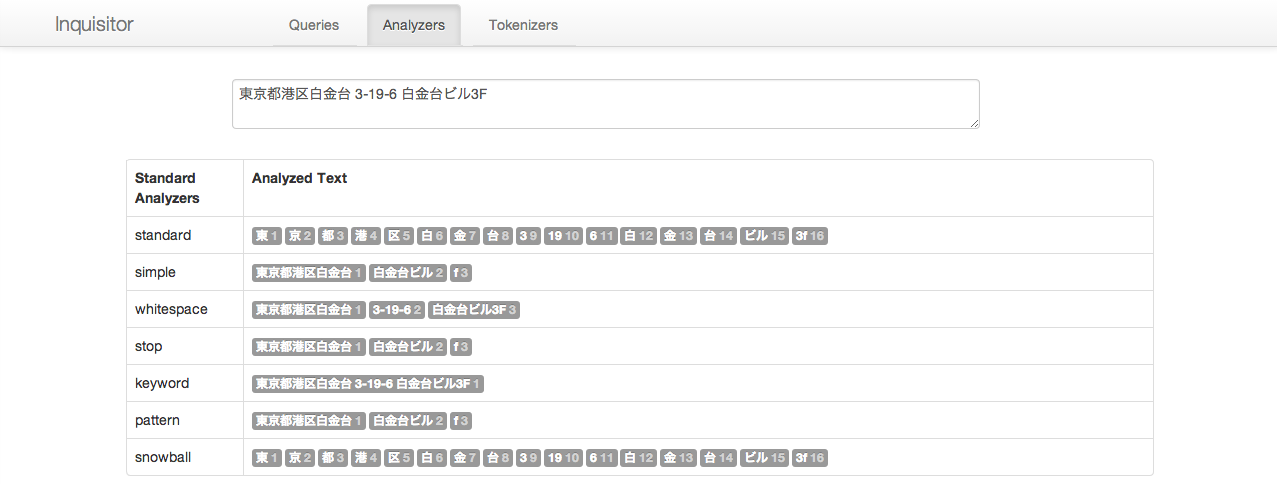
スタンダードの analyzer では前述のとおり、"東京“ ではヒットしない形に分割されます。そこで、kuromoji という日本語形態素解析ができる analyzer を使います。

inquisitor の少し下の方に、wantedly-demo index にて利用可能な analyzer の適用結果が出ています。こちらだと、"東京” や “白金台” でヒットしますね。
kuromoji の詳細や analyzer の適用結果を試したい場合は kuromoji 公式サイト から試すことができます。
形態素解析について概要を理解するには Elasticsearch 入門 の「N-gram と形態素解析」の項目を参照すると良いでしょう。
Mapping
データを入れる前に、もう一つ、 mapping というものをする必要があります。
Mapping とは?
外部データをElasticsearch上でどのようなスキーマとして表現するか定義することをmappingと呼びます。
(「Elasticsearch チュートリアル」より。参考: Mapping のイメージ)
先ほどの curl 実行時に mapping もやっていますので、内容を簡単に説明します。
  "mappings": {
    "company": {
      "_source": {
        "enabled": true
      },
      "_all": {
        "enabled": true,
        "analyzer": "kuromoji_analyzer"
      },
      "properties": {
        "id": {
          "type": "integer",
          "index": "not_analyzed"
        },
        "name": {
          "type": "string",
          "index": "analyzed",
          "analyzer": "ngram_analyzer"
        },
        "location": {
          "type": "string",
          "index": "analyzed",
          "analyzer": "kuromoji_analyzer"
        }
      }
    },
    "project": {
      "_source": {
        "enabled": true
      },
      "_all": {
        "enabled": true,
        "analyzer": "kuromoji_analyzer"
      },
      "_parent": {
        "type": "company"
      },
      "properties": {
        "id": {
          "type": "integer",
          "index": "not_analyzed"
        },
        "title": {
          "type": "string",
          "index": "analyzed",
          "analyzer": "kuromoji_analyzer"
        }
      }
    }
  }
- company
- ID - Integer 型, 分割しない。12 という ID を 1 で検索することはない
- 会社名 - String 型, 今回は wantedly や heroku など英文字だけ入れるとして wan とかでヒットしてほしい
- 地域名 - String 型, 日本語が入り、東京などの単位でヒットさせたいので kuromoji
- 募集
- ID - Integer 型, 分割しない。
- タイトル - String 型, 日本語と英文字が入る。kuromoji の token filter で lowercase してるので kuromoji
このように
- データのソースは elasticsearch に store するか
- このフィールドはどんな型か
- このフィールドにどんな analyzer をかけるか
といったことを定義しています。
データを入れてしまいましょう。(Bulk API という複数ドキュメントを一度に追加出来る API を使っています)
$ curl -XPOST 'http://localhost:9200/_bulk' -d \
'
 { "index": { "_index": "wantedly-demo", "_type": "company", "_id": "1" } }
 { "id": "1", "name": "wantedly",   "location": "東京都港区白金台 3-19-6 白金台ビル3F" }
 { "index": { "_index": "wantedly-demo", "_type": "company", "_id": "2" } }
 { "id": "2", "name": "heroku",     "location": "東京都千代田区丸の内2-7-2 JPタワー 12階" }
 { "index": { "_index": "wantedly-demo", "_type": "company", "_id": "3" } }
 { "id": "3", "name": "higanworks", "location": "大阪府大阪市中央区道修町2-2-5 " }
 { "index": { "_index": "wantedly-demo", "_type": "company", "_id": "4" } }
 { "id": "4", "name": "hatena",     "location": "京都府京都市中京区御池通間之町東入高宮町206" }
 { "index": { "_index": "wantedly-demo", "_type": "company", "_id": "5" } }
 { "id": "5", "name": "nulab",      "location": "福岡市博多区中洲5丁目5-13 KDC福岡ビル7F " }
 { "index": { "_index": "wantedly-demo", "_type":  "project", "_parent": "1" } }
 { "id": "1", "title": "iOS エンジニアウォンテッド!" }
 { "index": { "_index": "wantedly-demo", "_type":  "project", "_parent": "1" } }
 { "id": "2", "title": "Ruby on Rails 得意なエンジニアウォンテッド!" }
 { "index": { "_index": "wantedly-demo", "_type":  "project", "_parent": "2" } }
 { "id": "3", "title": "Ruby 好きウォンテッド!" }
 { "index": { "_index": "wantedly-demo", "_type":  "project", "_parent": "3" } }
 { "id": "4", "title": "Chef と Ruby 書ける人ウォンテッド!" }
 { "index": { "_index": "wantedly-demo", "_type":  "project", "_parent": "4" } }
 { "id": "5", "title": "Perl エンジニアウォンテッド!" }
 { "index": { "_index": "wantedly-demo", "_type":  "project", "_parent": "5" } }
 { "id": "6", "title": "Java エンジニアウォンテッド!" }
'
簡単なクエリと Sense
クエリを投げる段階に来ました。
http://localhost:9200/_plugin/marvel/sense/index.html にアクセスし、sense からクエリを実行していきます。
ここでクエリの実行コンソール sense を簡単に紹介します。
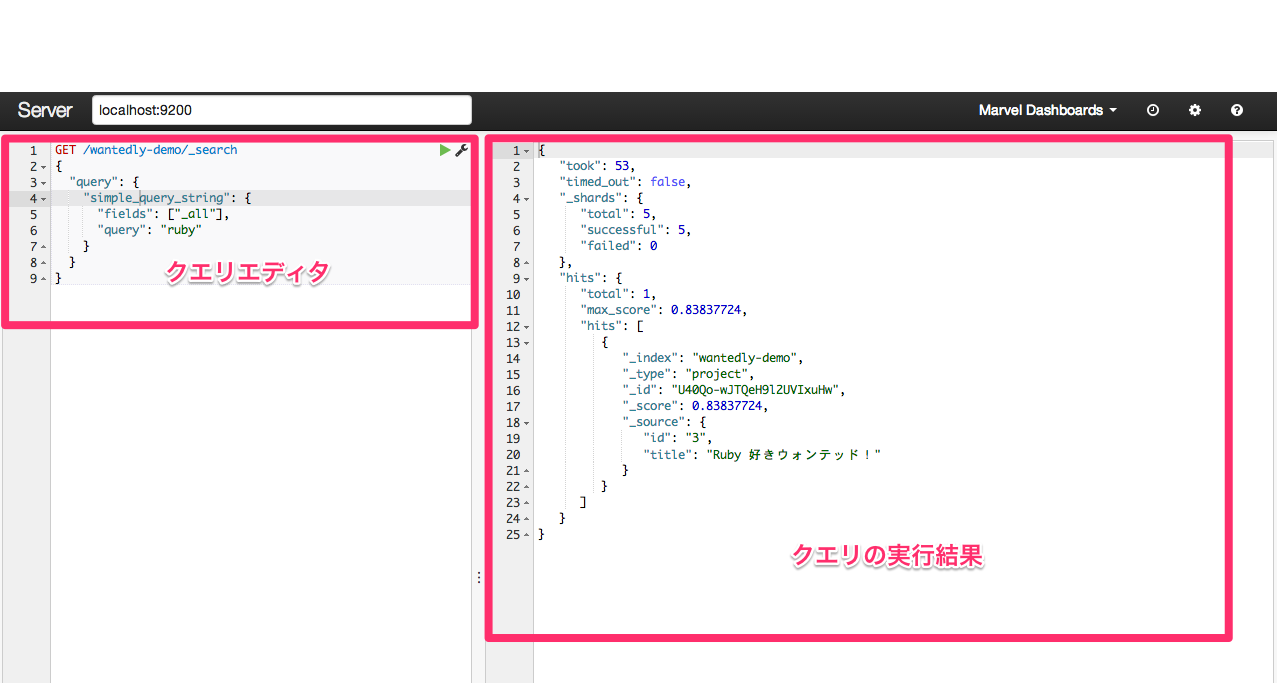
左側のエディタでクエリを書き、実行ボタンを押すと右側に結果が出力されます。
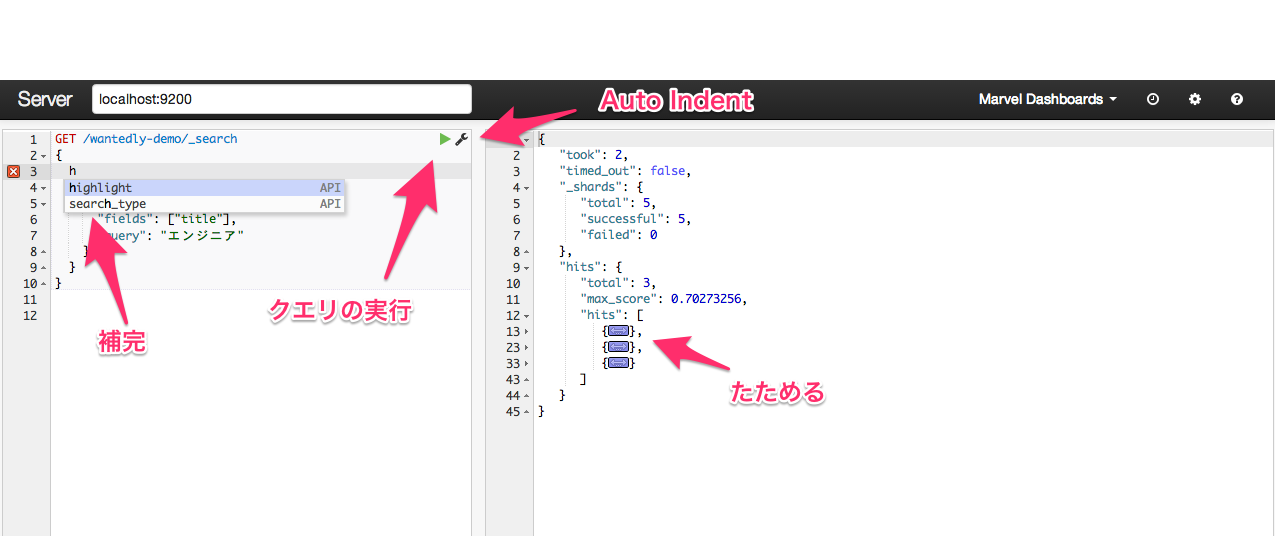
エディタは、補完が聞いたり、Auto Indent されたりと非常に便利です。
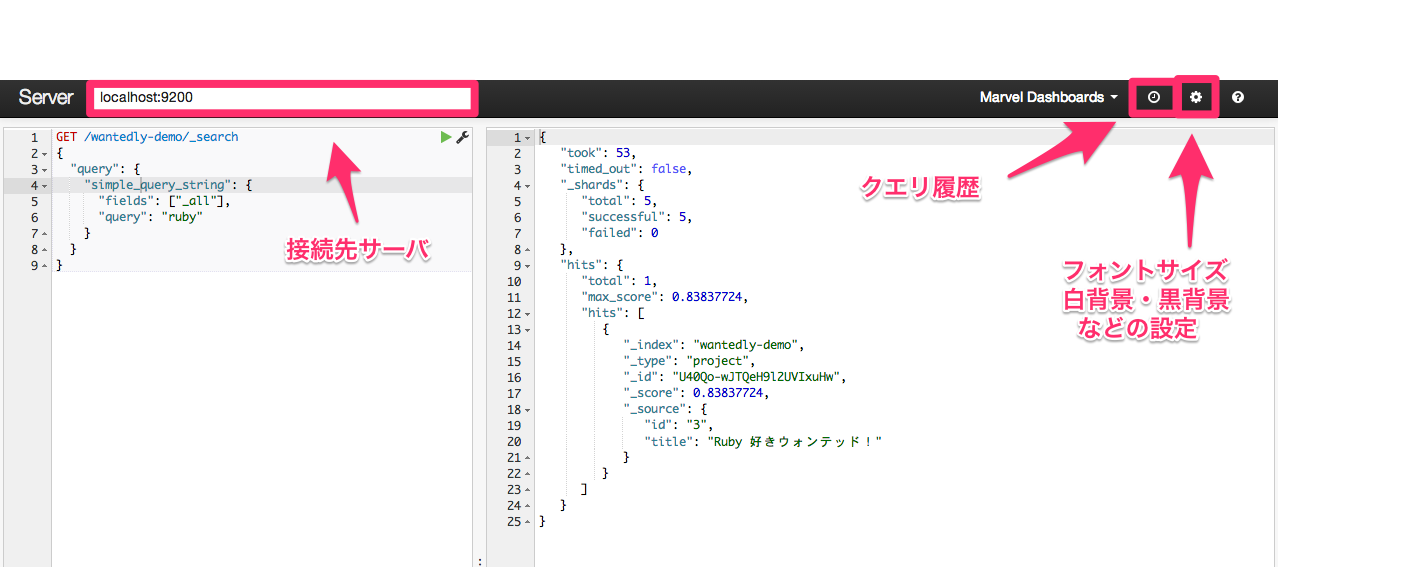
過去に実行したクエリも履歴から取得できるのも助かります。
sense について学んだところで、クエリを投げて行きましょう。
クエリ
GET /wantedly-demo/_search
{
  "query": {
    "simple_query_string": {
      "fields": ["title"],
      "query": "ruby"
    }
  }
}
実行結果
{
   "took": 1,
   "timed_out": false,
   "_shards": {
      "total": 5,
      "successful": 5,
      "failed": 0
   },
   "hits": {
      "total": 3,
      "max_score": 0.5,
      "hits": [
         {
            "_index": "wantedly-demo",
            "_type": "project",
            "_id": "ZeFYdj3FT9CUoACzzXMnRw",
            "_score": 0.5,
            "_source": {
               "id": "3",
               "title": "Ruby 好きウォンテッド!"
            }
         },
         {
            "_index": "wantedly-demo",
            "_type": "project",
            "_id": "hxLGgpBnQY2ho0CmlL_Utg",
            "_score": 0.43920785,
            "_source": {
               "id": "2",
               "title": "Ruby on Rails 得意なエンジニアウォンテッド!"
            }
         },
         {
            "_index": "wantedly-demo",
            "_type": "project",
            "_id": "40lOQV4iQ6-lF9ZuWLZ8Vw",
            "_score": 0.375,
            "_source": {
               "id": "4",
               "title": "Chef と Ruby 書ける人ウォンテッド!"
            }
         }
      ]
   }
}
“東京” と検索
GET /wantedly-demo/_search
{
  "query": {
    "simple_query_string": {
      "fields": ["_all"],
      "query": "東京"
    }
  }
}
location フィールドに東京と検索
GET /wantedly-demo/_search
{
  "query": {
    "simple_query_string": {
      "fields": ["location"],
      "query": "東京"
    }
  }
}
company type を対象として location フィールドに東京と検索
GET /wantedly-demo/company/_search
{
  "query": {
    "simple_query_string": {
      "fields": ["location"],
      "query": "東京"
    }
  }
}
今回の場合、どれも検索結果を同じになりますが、
_allフィールドという全てのフィールドを含んだフィールドから検索- あるフィールドに対して検索
- あるタイプに対して検索
の方法がつかめたかと思います。フィールドやクエリキーワードを変えて色々試してみてください。
fuzzy クエリ(曖昧検索)
GET /wantedly-demo/project/_search
{
  "query": {
    "fuzzy": {
      "title": "rubi",
      "fuzziness": 2
    }
  }
}
ids クエリ(ID のような完全一致かどうかみたいとき)
GET /wantedly-demo/_search
{
  "query": {
    "ids": {
      "type": "company",
      "values": ["2", "3"]
    }
  }
}
フィルタ
次は、フィルタを使ってみましょう。フィルタは、
- クエリと違ってスコアリング(どれのドキュメントがどれくらいマッチしてるかの数値)に影響しない
- キャッシュされる
という特徴があります。 速度面やスコアリング面を考慮すると基本的には絞り込み条件などは filter 、検索キーワードとのマッチングには query を使うと良いでしょう。
実際に、東京の会社をフィルタリングしてみます
GET /wantedly-demo/company/_search
{
  "filter": {
    "term": {
      "location": "東京"
    }
  }
}
{
   "took": 1,
   "timed_out": false,
   "_shards": {
      "total": 5,
      "successful": 5,
      "failed": 0
   },
   "hits": {
      "total": 2,
      "max_score": 1,
      "hits": [
         {
            "_index": "wantedly-demo",
            "_type": "company",
            "_id": "MEvWty6iRre0iM2SQe4X1A",
            "_score": 1,
            "_source": {
               "id": "1",
               "name": "wantedly",
               "location": "東京都港区白金台 3-19-6 白金台ビル3F"
            }
         },
         {
            "_index": "wantedly-demo",
            "_type": "company",
            "_id": "6AQTmjOCQXWuhfycvQ052A",
            "_score": 1,
            "_source": {
               "id": "2",
               "name": "heroku",
               "location": "東京都千代田区丸の内2-7-2 JPタワー 12階"
            }
         }
      ]
   }
}
2 つ出てきました。
東京と福岡の 2 カ所でフィルタリングしてみます。(terms フィルタを利用)
GET /wantedly-demo/_search
{
  "filter": {
    "terms": {
      "location": [
        "東京",
        "福岡"
      ]
    }
  }
}
親子関係
最後に、「ruby で検索してヒットする募集を出している東京の会社」といった検索をしてみましょう。
親子関係などのドキュメント同士に関連性を持たせるには、
- Innter Object の利用
- nested document の利用
- parent/child フィールドの利用
がありますが、Inner Object はあまり使いものにならないです。 残り 2 つのざっとした比較をすると
- nested
- メリット - クエリのパフォーマンスが高い
- デメリット - 更新が多いときのオーバーヘッドが大きい
- 用途 - 名前の通り入れ子なデータを扱いたいとき、(rails でいう has_many では使わないと思う)
- parent/child
- メリット - nested と違って更新時に問題を抱えてない
- デメリット - クエリのパフォーマンスが落ちる、メモリを多く要する
- 用途 - 名前の通り親子関係のもの、RDB 的な relation はこちらに近い
となり、今回はある会社がいくつかの募集を持っているという関係性なので parent/child を使います。
(詳しくは managing relations inside elasticsearch を参照)
parant/child を使うには、mapping のところで、特別なフィールド _parent を利用することを定義します。(さきほどの mapping 時に設定済み)
    "project": {
      "_source": {
        "enabled": true
      },
      "_parent": {
        "type": "company"
      },
      "properties": {
        "id": {
          "type": "integer",
          "index": "not_analyzed"
        },
        "title": {
          "type": "string",
          "index": "analyzed",
          "analyzer": "kuromoji_analyzer"
        }
      }
    }
そして、会社には、_id という elasticsearch 用の id フィールドに外部データの会社 ID を含めて追加し、募集は、_parent という elasticsearch 用の parent フィールドに親となる会社 ID を含めて追加します。
$ curl -XPOST 'http://localhost:9200/_bulk' -d \
'
 # Elasticsearch のドキュメントの ID に会社 ID を割り振っている
 { "index": { "_index": "wantedly-demo", "_type": "company", "_id": "1" } }
 { "id": "1", "name": "wantedly",   "location": "東京都港区白金台 3-19-6 白金台ビル3F" }
 ...
 # _parent フィールドに親となる会社ドキュメントの ID を指定
 { "index": { "_index": "wantedly-demo", "_type":  "project", "_parent": "1" } }
 { "id": "1", "title": "iOS エンジニアウォンテッド!" }
 { "index": { "_index": "wantedly-demo", "_type":  "project", "_parent": "1" } }
 { "id": "2", "title": "Ruby on Rails 得意なエンジニアウォンテッド!" }
 ...
'
ruby というキーワードにマッチする募集を持った会社を検索してみます
GET /wantedly-demo/company/_search
{
  "filter": {
    "has_child": {
      "type": "project",
      "query": {
        "filtered": {
          "query": {
            "query_string": {
              "fields": ["title"],
              "query": "ruby"
            }
          }
        }
      }
    }
  }
}
{
   "took": 1,
   "timed_out": false,
   "_shards": {
      "total": 5,
      "successful": 5,
      "failed": 0
   },
   "hits": {
      "total": 3,
      "max_score": 1,
      "hits": [
         {
            "_index": "wantedly-demo",
            "_type": "company",
            "_id": "1",
            "_score": 1,
            "_source": {
               "id": "1",
               "name": "wantedly",
               "location": "東京都港区白金台 3-19-6 白金台ビル3F"
            }
         },
         {
            "_index": "wantedly-demo",
            "_type": "company",
            "_id": "2",
            "_score": 1,
            "_source": {
               "id": "2",
               "name": "heroku",
               "location": "東京都千代田区丸の内2-7-2 JPタワー 12階"
            }
         },
         {
            "_index": "wantedly-demo",
            "_type": "company",
            "_id": "3",
            "_score": 1,
            "_source": {
               "id": "3",
               "name": "higanworks",
               "location": "大阪府大阪市中央区道修町2-2-5 "
            }
         }
      ]
   }
}
and filter で location が東京というフィルタも合わせて会社にかけます
GET /wantedly-demo/company/_search
{
  "filter": {
    "and": {
      "filters": [
        {
          "term": {
            "location": "東京"
          }
        },
        {
          "has_child": {
            "type": "project",
            "query": {
              "filtered": {
                "query": {
                  "query_string": {
                    "fields": ["title"],
                    "query": "ruby"
                  }
                }
              }
            }
          }
        }
      ]
    }
  }
}
{
   "took": 1,
   "timed_out": false,
   "_shards": {
      "total": 5,
      "successful": 5,
      "failed": 0
   },
   "hits": {
      "total": 2,
      "max_score": 1,
      "hits": [
         {
            "_index": "wantedly-demo",
            "_type": "company",
            "_id": "1",
            "_score": 1,
            "_source": {
               "id": "1",
               "name": "wantedly",
               "location": "東京都港区白金台 3-19-6 白金台ビル3F"
            }
         },
         {
            "_index": "wantedly-demo",
            "_type": "company",
            "_id": "2",
            "_score": 1,
            "_source": {
               "id": "2",
               "name": "heroku",
               "location": "東京都千代田区丸の内2-7-2 JPタワー 12階"
            }
         }
      ]
   }
}
これで「ruby で検索してヒットする募集を出している東京の会社」が検索出来るようになりました!
まとめ
ここまでで、
- elasticsearch 環境を準備し、
- どのようにデータを入れるかを決め(Mapping)
- どのように分割するか(検索でヒットさせるか)を決め(Analyzer)
- データを入れ、
- 検索する
と言った、Elasticsearch で検索を作るときの流れが追えたかなと思います。
今回は検索クエリは sense 、mapping などの設定は curl から行いましたが、sense だけで完結させることも可能です。
Tweet
最近の記事
- エンジニアブログは移転しました
- 管理画面チラ見せ♡ナイト#3 に登壇してきました
- Apple Watchアプリをリリースしていました
- Wantedlyのデザイン事情について UI Crunch #8で発表しました!
- Wantedlyの最近のReact事情についてMeguro.es #3で発表しました!
- Reactive Swift Meetup @Wantedlyを開催しました!
- 2016年のWantedlyアーキテクチャ (1)
- Wantedly Spring Internship 2016
- よちよちPythonしてきた〜プログラミングは料理と一緒〜
- Wantedly エンジニアチームは湯河原温泉で開発合宿を行いました!